Wednesday, December 18, 2013

Thor the dark world: Malekith miniature!


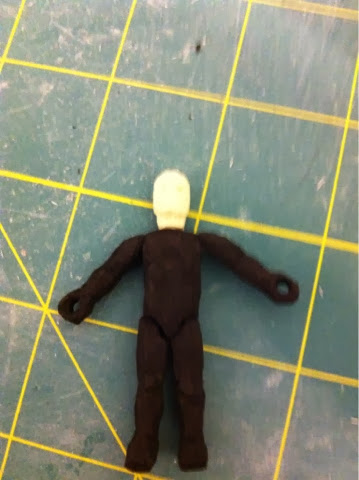
I have now completed the latest wrightworks miniature foam marvel character, Malekith the dark elf, who is the villain in the new movie "Thor the Dark world".  He was supposed to be finished a while ago but I kept delaying the work. I wanted to do step by step photos showing the creation process of one of our foam miniatures so I thought Malekith would be a good example. So the first picture shows the basic start to make the body. The arms and legs are rectangular blocks of 6mm black foam and the body has an extra 3mm layer glued on. Then the head block is five 3mm pieces glued together. In the picture below I have already cut away bits of the body block to form the final shape.


Ok so a lot of cutting happens in between these pictures, which is kind of hard to document with pictures since it's slow so instead I just did before and after pictures. You can see that the chunky blocks have been slimmed down and shaped into arms and legs, as well as the basic head shape. Also the limbs were attached by poking wire into the foam, one through the arms, and one though the legs


I found some shiny silver paper that was perfect for his armor and I cut out some pieces and glued them on.


I added some more details with more paper glued on (the belts and chest star) and then began to cut out a cloak from some lightweight fabric. It was tricky to cut out a good shape that could be wrapped over his shoulders and glued together but I eventually did something that worked.


Next I started the hair by cutting off the top and back of his head and gluing some chunks of white foam on in in those places.


Here is what it looked like after I cut it into the shape of his head. I also added very thin foam pieces to the sides of the head, leaving spaces for the ears, which were more tiny foam pieces (also they must be cut pointy since he is an elf)


I sort of skipped a lot now and only have a picture of his face after all the details were made. The eyes were tiny pieces of paper with pen ink dots for pupils and his mouth is a simple line drawn with a pen. Also Malekith wears a weird armor piece on his head that I cut out of paper. He is wearing the fabric cloak here as well.


The only thing left to do was put some paint on the right side of his face since in the movie it is supposed to be burned from Thor's lightning (I guess thats a spoiler if you haven't seen the movie). The 2-face look is his signature appearance in the comic books as well, though it was half blue and half black rather than black and pale like this.


I may actually add some more paint to make the burned face darker, but it is quite hard to work with paint at this scale.

So that's Malekith! I hope you like him, I pretty happy with the way he turned out and there weren't really any problems with making him.



Wednesday, November 27, 2013

A Marvelous Thanksgiving

We love holidays here at Wrightworks, so I thought i'd show how our miniature marvel superheroes feast on turkey day! 

Monday, September 30, 2013

Halloween


I was going to begin posting my halloween project this year on Wrightworks but then I realized, it would be better if my halloween projects were featured separately in their own category since they are very different from the stuff we normally make. So, I have created a new blog as a branch off sub-blog to WrightWorks. It is called "HalloweenWorks" and you can get to it through this link http://wrightworkshalloween.blogspot.com. My first project on display is my Red Skull mask which I made for Last year's Halloween. This is a picture of the character himself taken from the movie "CaptainAmerica: the First Avenger"


So check out the blog if you like halloween props and costumes, Me and my brother are always experimenting with new ideas and I have some big plans for Halloween this year!


Monday, September 23, 2013

Abomination: molding and casting


Finally I have completed the next step in my project. It is probably the hardest one of all in this process of making the clay Abomination sculpt into a usable, flexible action figure. I encountered several problems along the way and at one point I was afraid my great sculpt may have been wasted. But I have prevailed and now have a successful casting of Abomination. Final pictures are at the bottom but I have also documented the making process step by step, so take a look!


First I began by making the form for the plaster mold using a piece of sturdy foam board with clay walls bordering it. Then I mixed up some plaster and poured it in. While it was still wet I placed the clay sculpt in, frontside up. After trying to even it out and make it cover all the back areas (under the hands was difficult) I ended up with this...

His feet must be aligned with the bottom in order to make an opening to the mold. Unfortunately this first mold was a failure (you'll see why)


Next I mixed up some more plaster and created a front half of the mold. I did not yet realize the mistake I had made however. The problem was revealed after opening up the mold

Those are the soles of his feet there.


The problem was revealed when I tried to pry open the two plaster halves. I had not realized that they would be too thin and weak to stay intact, so the top half cracked into 3 pieces when I tried to force it apart.


Amazingly the sculpt was still intact aside from some minor fixes (like his head being ripped off). With just a few touch ups I restored it well enough and then was able to redo the top plaster half.


The first time I actually forgot to put clay pieces around the edges in order to make wedge spaces to make prying the mold apart easier. (in the 4 corners)


The way I ensured the strength of the plaster was by putting some of this netting cloth in the plaster layers while it was wet. This time I ended with a stronger and thicker front half.


Of course, there was another problem, the back half was too weak. So when I pried it apart this time that half cracked!


Once again the sculpt had survived so I redid it the stronger way and finally opened it up and was able to remove the sculpt, leaving two decent halves!


Now I could begin the casting process. I wanted to use silicone rubber, which would have made it easier, but I wanted to conserve that for my next project (spoiler!). So instead I coated the mold with latex that I would then fill with expanding foam.
                         That's the latex coat below.


Then I put the two halves together, mixed up some 2-part expanding Poly-foam. I was unsure whether this would work since it The stuff is a bit unpredictable and I didn't know if it would fill the whole mold, but man that stuff expanded. After pouring it in through the feet it unexpectedly started shooting out and overflowing. It has a very quick work time (less than a minute) before it starts expanding like crazy! Then all I had to do was wait a couple of hours for it to cure.


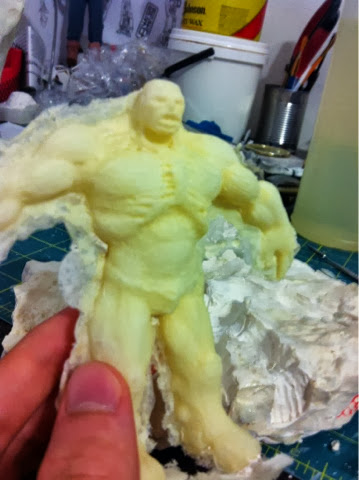
I was quite surprised by the result, he turned out a lot better than I thought and the latex looked great and worked well as a skin. The foam had expanded all the way too his hands, minus the small fingers, but that was ok for now.


I was quite amazed with the result once I freed him from the plaster. After trimming off the extra latex on the seam he looked great


The latex picked up the detail quite nicely


Here he is compared to the original clay sculpt (left), minus it's head.


I sort of forgot to put a wire armature in him so right now he is not posable. This is only a test version really so I will eventually get around to doing a recast using silicone rubber.


All in all it was a much better success than I expected! the only thing left is to paint him. That may have to wait though because I need to start my halloween project (post soon to come)

here is a video to see him in action!

Saturday, September 14, 2013

Abomination sculpting


This is our newest project. The character is: the Abomination, the incredible Hulk's arch-nemisis. He will join our collection of miniature foam Marvel characters, however he is made in a completely new way. I am sculpting him out of clay and then molding and casting him in silicone rubber, rather than carving him out of craft foam because of his large size. The version of the character in the movie "the Incredible hulk", which is the version I am making, is meant to be about 11 feet tall. The scale we normally use for our mini figures is very roughly a 1:32 scale (this means 1 foot in real life equals 32 miniature feet) so that means my sculpt must be about 4 inches tall. Anyway, I am using a new method because layered craft foam tends to be too tough and stiff for larger character sculpting. But that's enough words for now, here are the sculpting progress pictures.


First some basic shaping; the clay is build up around a wire armature.


Minor shaping of the body is done...


Side view


Detail added to the chest...


Leg and arm shaping...


One hand is complete...


Now the face!


And here he is! This took about one week to do but I am very happy with the results. The next step is to make a plaster mold and cast him with rubber.


Top view


And this picture shows his size in comparison to the normal sized foam characters (middle), the sponge foam Hulk(right) and the work is progress clay Hulk(left). He will be the largest character we have made for this category of creations.